Tag Archives: art projects

Art in the Park

Image
Check out this fairy house on ActiveKidsClub.com 

This month during the Arturo’s Art and Me class, families focused on nature and were able to enjoy the newly opened Klyde Warren Park that is right across the street from the DMA. Danielle led children and their grown-ups on an imaginary journey into the world of fairy houses. Fairy houses have become quite popular in the past couple of years – many speciality garden and landscape stores now sell teeny-tiny plants and accessories just for fairy houses. Fairy houses, or fairy gardens, are small installations made completely from natural materials created with the idea that fairies and woodland creatures to visit, rest, and even inhabit.

Image

During the Arturo’s Art and Me classes, the children explored two landscape paintings and imagined all of the different types of creatures that could be lurking in the woods in these works of art. Danielle read Fairy House by Tracy Kane and taught the children all about respect nature.

Image

Using images of unicorns, skunks, trolls, squirrels, gnomes, fairies, and rabbits, the children had a discussion about which ones were real and which might be imaginary. Not all of the kids were convinced that unicorns were imaginary, but they were all glad that trolls were! Families used Model Magic to create their own creature – it could be anything, real or imaginary. There were several fairies, a couple of gnomes, many snakes, and even a puppy.

Image

After making our creatures, we determined that these new friends needed a place to call home and traveled over to the Park to find a suitible spot. At the Park, each family received a bag filled with twigs, leaves, pinecones, seashells, acorn tops, raffia, and rocks to construct a nature home for their creature. Families spread out in the Park to build their fairy houses.

ImageSome built their houses in the children’s area of the Park (including one fairy house built inside of a concrete tunnel!), others found a place for their house at the base of a tree trunk or in a bush, while a few families spead out on the lawn to build their constructions out in the open. When families were finished with their creation, they packed up their nature supplies so that they could reinstall their fairy house (or snake house, dog house, or bunny house) at home!

Image

Posted by Amanda

Leave a comment

Filed under Art Projects, Children’s art, DMA Programs

Drawing with Light

If you stopped by the Center for Creative Connections during the October Late Night at the DMA, then perhaps you saw or experienced the wild creations in the Tech Lab.  Visitors of all ages were given 15 seconds to create a drawing with light.  Light Drawing has been around for nearly a century, and yet it remains a fresh, fun, exercise that many photographers experiment with today.  The influx of new light and camera technologies has made this concept more accessible.

First a word about how it works.  All cameras work by controlling light in two ways –through the aperture and the shutter speed.  The aperture or f-stop determines how much light is exposed in each shot. A smaller aperture, like f/2.8 results in more light being let through, while a larger aperture, like f/22 results in less light being let through:

The shutter speed controls how long the shutter is open.  If your shutter speed is 500, that means that the shutter is open for 1/500th of a second.  If your shutter speed is 15, that means your shutter is open for 1/15th of a second, therefore capturing more light (and action) over time:

For drawing with light, it’s best to have the shutter speed set for over 1 second.  When we took our visitors photos during Late Night, we set our shutter speed to 15 seconds.  You are probably best off setting your aperature to a medium setting like around f/8 or f/11.

So, how can you bring the magic of Drawing with Light into your home?  Here are some steps to get you started:

  1. Gather materials: Digital Camera with adjustable shutter speed (all Digital SLRs are capable of this and some point and shoot cameras are as well); a tripod (or other way to stabilize your camera); a few light sources (laser pointers, cell phones, flashlights, Christmas lights, etc.)
  2. Set camera to a manual setting where you can control the shutter speed.
  3. Set the shutter speed to 15 seconds (or as slower if you want more time).
  4. Set the camera on the tripod and position it as desired.
  5. Turn off all the lights in the room.
  6. Hand the kids the flashlights, laser pointers, etc.  and press your shutter button.
  7. Now you have 15 seconds to make a drawing!

The great thing about using a digital camera to capture your Light Drawing is the instant feedback.  Take a few photos where your kids can just play with the lights, with no end product in mind.  After the picture is made, let them look at their creation.

You can keep it simple or get more complicated; work as a team, with one person posing while another draws around them; make words in the air; or dance with the lights and see what happens.  Above all, have fun!

Check out our slideshow for more inspiration.

Posted by: Jessica Fuentes

Leave a comment

Filed under 6 to 12 year olds, Art Projects, Center for Creative Connections, Just for Fun, Late Night

Artsy Pumpkins

Halloween is just three days away—is your pumpkin ready? Carving pumpkins was always one of my favorite family traditions. It usually took us an entire evening to choose the pumpkin, scoop out the inside slimy bits (yuck!), roast up the pumpkin seeds (yum!), and then decide what kind of face our jack-o-lantern would have. I had a tendency to stick to the traditional triangle-eyed, jaggedy-tooth smiley face.

If you have yet to decorate your own pumpkin, why not take an artistic approach this year? Think of your favorite artist and imagine how his/her style would look if the artist had worked on a pumpkin rather than a canvas.

Here are a few ideas to get the creative juices flowing:

Action painting pumpkin

Channel your inner Jackson Pollock by dripping and flinging paint onto your pumpkin to create a Jack{son}-o-Lantern. For a darker, spookier effect, draw your color inspiration from the Cathedral painting currently on view at the museum. Or try a rainbow of color by following Kathy Barbro’s tutorial on her blog Art Projects for Kids.

“Cathedral,” Jackson Pollock, Dallas Museum of Art, gift of Mr. and Mrs. Bernard J. Reis

Pollock Pumpkin from Art Projects for Kids

Color Field pumpkin

In a preschool class I taught last week, the children decided that the orange featured prominently in Mark Rothko’s Orange, Red and Red was “pumpkin orange,” so it seems fitting that Rothko becomes the inspiration for another artsy pumpkin. Create floating fields of color on your pumpkin-canvas with spray or craft paint. Sibylle at the Funkytime blog used bright neon colors, but you could also create a pumpkin using different shades of just one color.

“Orange, Red, and Red,” by Mark Rothko, Dallas Museum of Art, gift of Mr. and Mrs. Algur H. Meadows and the Meadows Foundation, Incorporated

Ombre pumpkin from the Funkytime blog

Lines and shapes pumpkin

For an even simpler pumpkin project, just use washi tape or scrapbooking tape to create criss-crossing lines of pattern across the pumpkin in the style of Piet Mondrian. Get the how-to at Real Simple here. Or use painter’s tape to section off areas for blocks of color like Bronwyn did on the Queen B Creative Me blog.

“Place de la Concorde,” Piet Mondrian, Dallas Museum of Art, Foundation for the Arts Collection, gift of the James H. and Lillian Clark Foundation

Tape pumpkins from Real Simple

Mondrian-inspired pumpkin at Queen B Creative Me

If carving is more your style, check out this amazing slide show of art-inspired pumpkins at The Huffington Post.

Happy Halloween!

Posted by: Leah

Leave a comment

Filed under 6 to 12 year olds, Art Projects, Just for Fun

Make it Yourself: Custom Skate Decks

Custom skateboard deck by Anton.

On Sunday, teens embarked on a custom skateboard deck design workshop with our special guest artist, Mark Gutting. Mark, who teaches art in Mesquite ISD, has taught summer camps at the DMA for the last several years and has led some dynamite classes focused on design. This weekend he lent his expertise to our monthly Urban Armor class, where participants had the opportunity to gain inspiration from the exhibition Variations on Theme: Contemporary Art 1950s-Present and design boards using screen printing techniques, markers, and paint.

Mark Gutting demonstrating screen printing techniques using his custom jig.

You can make your own deck at home using the same materials. Blank decks are easy to find and are relatively cheap (we bought ours from the Rec Shop in Dallas; www.recshop.net). Metallic sharpies and paint markers work well, as will acrylic or enamel paint; spray paint would be ideal. To get a nice, clean graphic, use painters tape to mask off the edges off your image before you paint it. Or, cut out a stencil to use–this is a great technique when using spray paint, especially if you want to repeat the same image throughout your design.

Max using a combination of stenciling and painting techniques on his deck.

If you want to get really fancy, try screen printing your deck. You’ll need a screen, screen printing ink, and a squeegee (all available at Michaels and Asel Art Supply, among others). To make things easier, I would use a cut paper stencil design to use with your screen but you can also transfer an image to it using emulsion fluid, etc. For the DIY enthusiast, there are several sites that have instructions for making your own tabletop jig for screen printing skate decks (YouTube is a great resource for that). This set up will not only make screen printing the board’s surface much simpler, but allow you to print multiple decks.

Printing Max’s design using Mark’s handmade jig.

After you finish, let your design dry thoroughly before using it; you’ll also probably want to give it a coat of clear finish if you’re going to be skating on it. If you don’t want to ding up your masterpiece, you could turn it into a wall art display by mounting it in your room or even add some functionality by making it into a cool shelf!

Urban Armor is a monthly program for teens. Go to http://dallasmuseumofart.org/Events/Adults/index.htm for more information.

Posted by: JC

Leave a comment

Filed under 6 to 12 year olds, Art Projects, Center for Creative Connections, DMA Programs, Just for Fun, Teens, Uncategorized

Friday Photo

Arturo’s Art & Me goes to Mexico!

For the entire month of September, Arturo’s Art & Me is exploring the art of ancient Mexico! Families tour The Legacy of the Plumed Serpent exhibition and use the beautiful artwork as inspiration for a hands-on art-making activity in the Center for Creative Connections studio.  The kids create their own version of a codex–a special kind of book that has many folded pages–which tells a story only through pictures (just like the Children of the Plumed Serpent did!)

Leave a comment

Filed under Art Projects, Children’s art, DMA Programs

Make This: Back-To-School DIY Stickers!

Ah, back to school. I remember doodling all over my notebooks and textbooks, which I thought made them look cool but was certainly not appreciated by my parents when it came time to return the latter. If your kids are anything like I was, help them add some flash to their gear without the hassle by having them create their own stickers using contact paper and sharpies. The best part about it is that they can layer the stickers they create and then peel them off when they get tired of them, without any mess!

What You’ll Need:

  • Contact paper (I used clear, but there’s a wide variety of colors and patterns to choose from)
  • Sharpie markers in different colors
  • A pair of scissors

Instructions:

  • Draw your design in sharpie on your contact paper. If you’re using clear contact paper, you can even trace over an existing drawing or design!
  • Cut out the design with your pair of scissors once it’s dry.
  • Carefully remove the backing from the contact paper and stick your design on a notebook or other surface.
  • When you want to remove the sticker, simply peel it off–it shouldn’t leave any sticky residue. And if your sticker is still intact, you could slap it on something else!

Tools of the trade


Draw your design


Cut it out…


Slap it on!

Other Ideas:

  • Create a collage sticker using images from magazines, decorative paper, etc.–lay your cut outs on top of the surface you want to stick them to, then cut a large enough piece of clear contact paper to cover the entire design. Peel off the backing and lay the contact paper on top of the design.
  • Running for class president? Stick a design onto some blank buttons to hand out for your campaign!
  • Celebrating a friend’s birthday? Decorate the inside of his or her locker with fun (and/or embarrassing) stickers!

Posted by: JC

Leave a comment

Filed under 6 to 12 year olds, Art Projects, Children’s art, Just for Fun, Parents

Friday Photo

Image

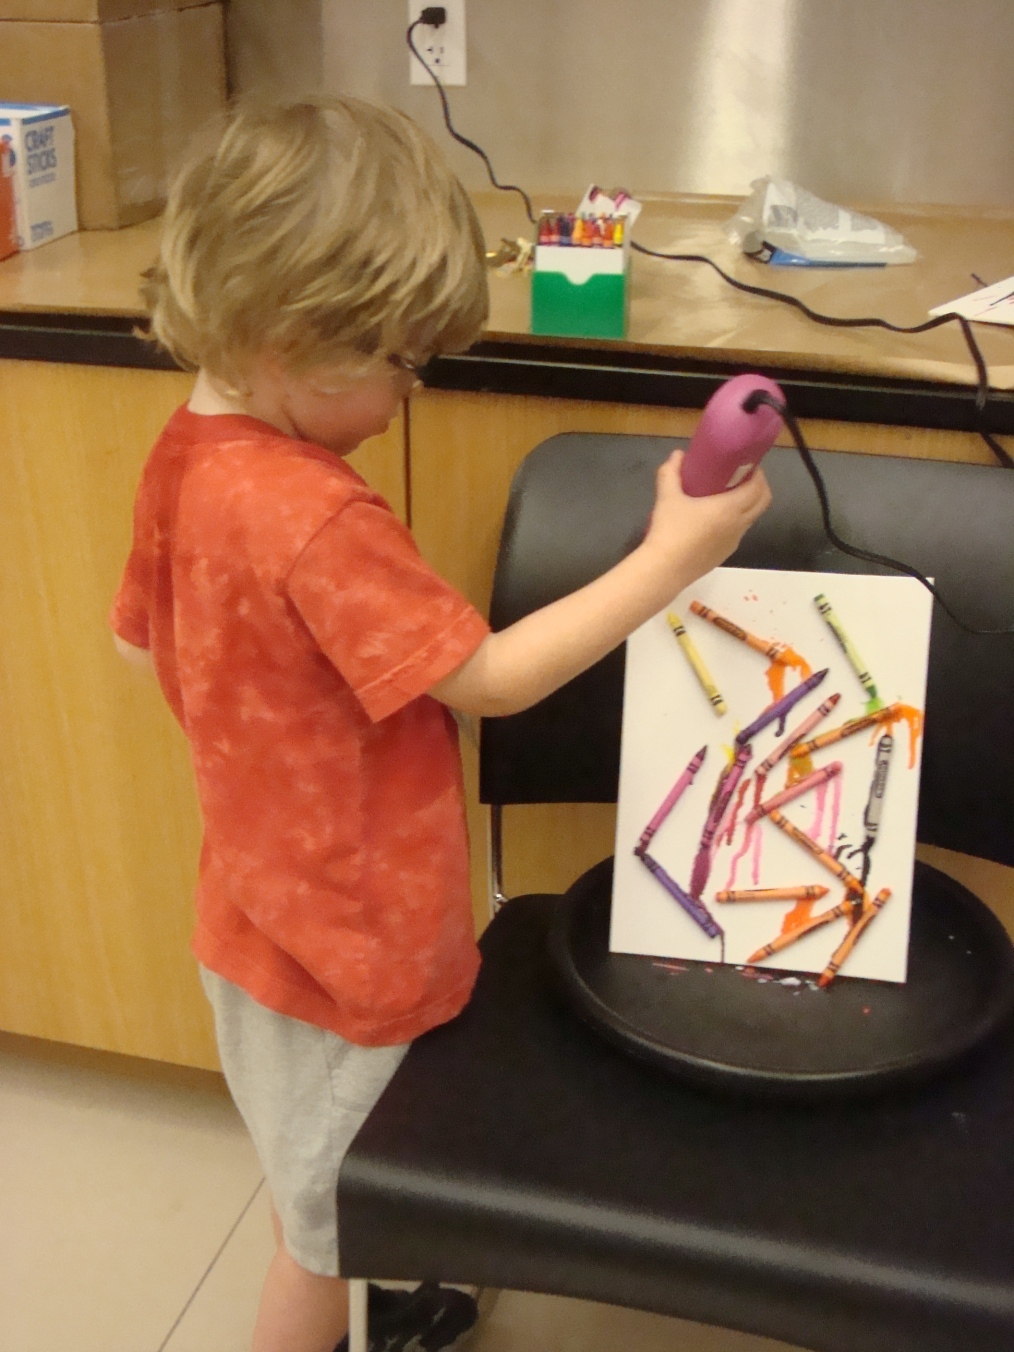
Next week, many children are going back to school here in the Dallas area. While you’re out shopping for your number 2 pencils, paper, scissors, and glue, pick up an extra box of crayons and turn your school supplies into a work of art! Simply arrange the crayons in a pleasing pattern on your canvas, hot glue in place, then use a heat gun or hair dryer to melt!

Leave a comment

Filed under Art Projects, Children’s art, Just for Fun

Letters from Camp: An Insider’s Perspective

Each year, the Family Experiences staff has the privilege of working with a wonderful and extremely talented group of summer camp interns. These dynamic individuals truly make up the heart and soul of our camps and are responsible not only for the day-to-day operation of the program but for also helping to make the connection between our campers and works of art something that is both enjoyable and transformative. We could not run our camps without them! This is the fourth in a four-part series written by our summer camp interns and reflecting on their experiences at the Museum.–JC

What the Kids Taught Me

Throughout the summer, we have been teaching young artist from ages 4-12 about art. Portraiture, landscape, abstract art, print making, and color, were just a few of the topics that we explored. While the teachers and interns were busy teaching the children the basics of art, the kids in fact were teaching us about creativity and life. Here are a few things that I have learned from the students:

1)      It’s okay to color outside the lines sometimes.

One of the first rules that children learn when they do art is to color inside the lines. While this may work to be more appeasing for the adult’s trained eye, it also stifles the child’s ability to think in their own unique way. The training to follow the instructions the lines with the rest of the class, changes the child’s creativity from free flowing to uniform. This standardization is then realized in adulthood when adults are then told that they need to “think outside the box” or in more artistic terms, color outside the lines. We should skip the middle phase and allow the creativity to flow no matter what stage of life we may be in. I have seen that the kids have it right from the start – be fearless in creativity and do not always conform to the lines determined for you.

2)      Don’t let ability limit creativity

As most can see, four- year olds do not have the greatest finesse with their art. However, it has never stopped them from creating! After a certain age, people are discouraged from doing things that they are not particularly skilled in which tends to put a lid on some children’s inventiveness and curiosity. What I have seen from the young children is that even when they can’t draw a perfect shape or choose the most realistic colors for their self – portrait, there is still a beauty in the individuality that cannot be replicated. I have learned to appreciate that unique beauty in their art as well as mine and, even further, in life.

3)      Look at things from a new angle

One project that a 9-12 year old class did was to create still life paintings from the objects that were set on their table. When the project was announced, the students immediately got to work knowing automatically how they would create their masterpiece – except for one student. This one student, Antonio, looked at his still life alligator piece from several angles then asked the teacher, “Can I do my still life from a bird’s eye view?” This was a strange and exciting because I had never thought of doing a still life painting from another angle other than straight on.  But when I saw his painting, I found it to be brilliant, unique, and added a new perspective to the alligator piece that I had never really considered. Since then I have begun to look at pieces from different views, noticing the small wonders from weird angles that would normally be ignored. Antonio taught me to never see things strictly as they are and to use different ideas and points of view to make art and life more fascinating.

4)      Abstract art is from the heart

The very first week of camp, I worked with a group of 4 and 5 year olds. While discussing what the class would say for their exhibition on Friday, one child raised their hand and said “Abstract art is from the heart.” This phrase has been my source of inspiration, motivation, and understanding this summer. Art is a blank slate for any concept, feeling, sensation, memory to become realized. With the stresses of everyday life, I forget that I always have art to turn to for relief and rejuvenation. Another reason why I love this phrase so much is because when I don’t understand a piece of contemporary art, I think about this phrase and imagine the emotions that the artist went through while creating the work and I gain a better appreciation for the piece and the artist. This awesome saying has truly transformed the way that I interact with art by giving me more revere and love for free flowing creativity.

In conclusion, these wonderful young artists have taught me that creativity should never stop in the classroom. Art and imagination go hand in hand and are in every aspect of life. I should never stop creating, never stop wondering, and never stop coloring.

Posted by: Lily Ngaruiya

Leave a comment

Filed under 6 to 12 year olds, Art Projects, Center for Creative Connections, Children’s art, DMA Programs

Letters from Camp: An Insider’s Perspective

Each year, the Family Experiences staff has the privilege of working with a wonderful and extremely talented group of summer camp interns. These dynamic individuals truly make up the heart and soul of our camps and are responsible not only for the day-to-day operation of the program but for also helping to make the connection between our campers and works of art something that is both enjoyable and transformative. We could not run our camps without them! This is the third in a four-part series written by our summer camp interns and reflecting on their experiences at the Museum.–JC

For the past couple of summers I have caught myself relaxing by the pool, hanging out with family and friends and constantly practicing for the up and coming marching season with the band. I never thought I would find myself spending countless hours with wild kids all summer and I never thought I would enjoy the company of them as much as I have.

The summer camp kids astound me. It’s amazing how many different personalities walk through our doors. From kids who think they are ninjas, constantly striking new warrior poses; to kids who have their whole life planned out, becoming the mayor of a huge city; they all have one thing in common–they are all creative. Sometimes we find creativity in unexpected places. When parents sign their children up for art camp they expect to see creativity in all the artwork created throughout the week and they sure do find it! If only the parents could see all the creativity that happens during the week that does not end up on paper.

Take our ninja for example. He wasn’t always the most focused child when we were in the galleries, but once you asked how a ninja could relate to the piece of artwork we were viewing he was quick to come up with a wonderfully creative story and it was hard to stop him! I will never forget in ABCs of Art when we took a special field trip to the Crow Museum to learn some yoga. When we began the exercises our special ninja was not really in the mindset to participate in yoga until he heard of a special pose called warrior. He quickly jumped in and explained to me that all warriors exercised like that to defeat the evil wicked villains. In this case our ninja’s creativity was not always found in his art work but instead in his action stories he created in his wild imagination.

Thomas Sully, “Cinderella at the Kitchen Fire”, 1843

Most of the creativity in the camps comes from inspiration during our gallery walks. Our story teller took our Think Like a Pro camp to view the Cinderella painting by Thomas Sully and asked the kids why they thought Cinderella had a slight smirk on her face. Without hesitation the students threw out answers: her cat made her happy, the prince finally told her he loved her, and she was happy because she tricked her wicked step mother. After the kids individually had a story that went along with the painting they looked around the room and found ways to incorporate the other works of art into the story of Cinderella. Their imaginations bloomed later the next day when they each got to make up a completely new story with the help of a painting they choose themselves.

Personally, my favorite creations from the students are the most random ones. A mustache outbreak was formed in one of the classes and eventually everyone was wearing a cutout mustache and had an alter ego. Although we don’t tell the parents all the other wild things their children come up with during the week I am glad I got to experience all the imaginative creations with the kids. This summer has been the most enjoyable experience and I could not ask for anything other than that.

Posted by: Toni Madrid

2 Comments

Filed under Center for Creative Connections, Children’s art, DMA Programs, Parents

Friday Photo

Image

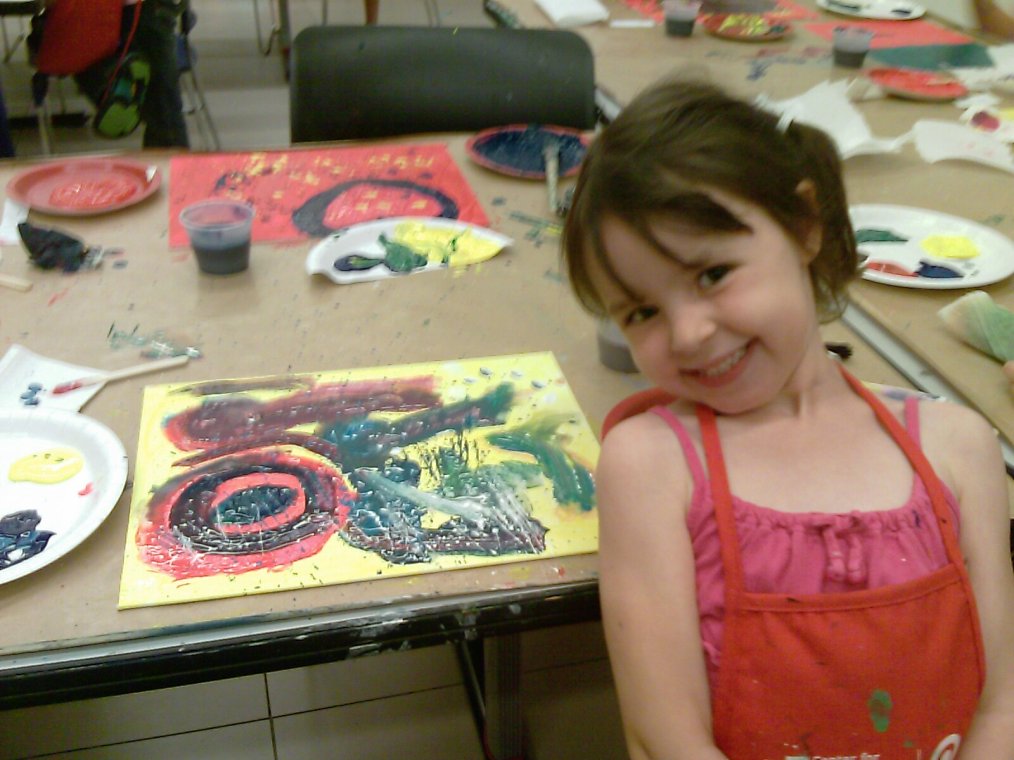
Summer Art Camps: A happy camper proudly displays her Jackson Pollock-inspired action painting.

Posted by: Karen Parrish

Leave a comment

Filed under Art Projects, Center for Creative Connections, Children’s art, DMA Programs, Parents, Uncategorized